Important: Fireapis services will be ending on May 15, 2025. For any concerns, please contact us via in-app chat or throughemail.
How to implement magic link logic on Nocode backend [Part-1]
We have covered step by step guide on implementation of magic link login on nocode backend
What is magic link
Magic link is a passwordless login mechanism that uses a valid user email address to authenticate and log users into an application. It works by sending a unique link to the user's email. The user clicks the link, which verifies the token embedded in it, and completes the authentication process, provided the link originates from a trusted site.
Pros and Cons
Pros:
- No need to remember fancy passwords.
- Simple and easy logins
- Easy account recovery
- More secure against password theft.
Cons:
- More dependent on email
- Risk of spam links from legitimate sites.
- Requires user awareness about how magic links work.
- Vulnerability if the user's email account is insecure.
Implementations:
Requirements
- A
usertable in database to verify the existence of the email. - An email providers like SendGird, Mailchimp, MailerLite, Brevo, etc to send email to user
- A functional backend to process the logic (validations & hosting). For this guide, I’ll use the Fireapis platform.
Step-by-Step process:
We will login into Fireapis and create a user table with email as one of the fields to process(storing & validating) user authentication.
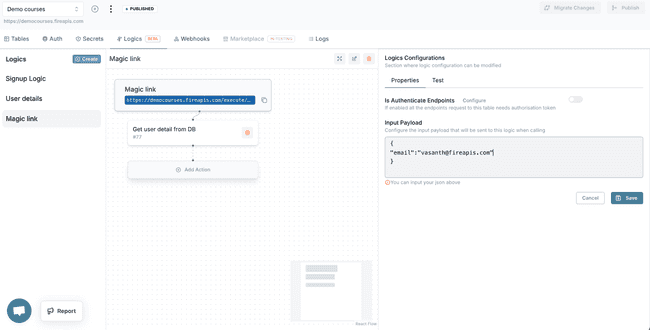
Next, I will go to Logics tab, and create a logic as Magic link logic.
Next, Configuring input payload for the logic This payload will be used when integrating the logic with the frontend.
Below is an example payload configuration:
{ "email": "[email protected]" }
We will add five actions to build magic link logic. These actions will validate and send a email with login link to the provided email
- Database query action
- Conditional action
- Build Object action
- Data Transformation action
- API Request action
1. Database query action
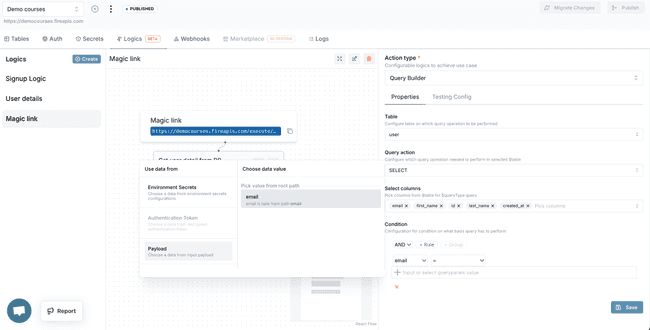
The first action will be Database Query Action (add this by clicking the Add Action button and selecting Database Query as the action type).
I am going to get the user details with this email id, in order to check whether this user is a valid user or not.
This action retrieves user details based on the provided email address to check if the user exists. Configure it as follows:
- Table:
user - Columns:
id, name, email, created_at - Query Type:
SELECT
Add a condition in the Condition Builder:
- Logic:
AND - Column:
email - Operator:
= - Value:
payload.email(use the Dynamic Data Source Selector interface).
I have configured the database query to get the user detail and next would be testing logics till our first action to get expected results.
Testing the Action
Test the logic up to this action using the Test tab in the Logics configuration.
- Case 1: Provide a non-existent email to ensure no user details are returned.
- Case 2: Provide an existing email to retrieve the corresponding user details.
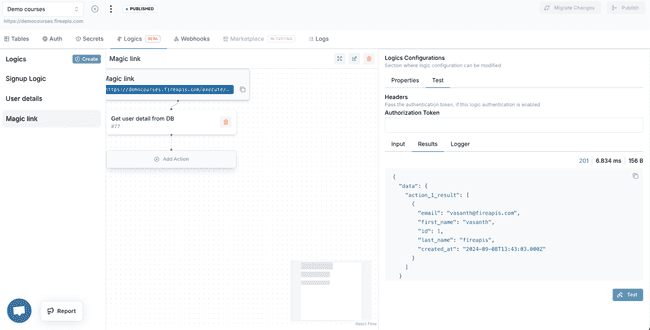
Expected Results
{
  "data": {
    "action_1_result": [
      {
        "email": "[email protected]",
        "first_name": "vasanth",
        "id": 1,
        "last_name": "fireapis",
        "created_at": "2024-09-08T13:43:03.000Z"
      }
    ]
  }
}
Next would be adding a Build Condition action to check if the user is there or not, if not will create new user into user table (with consideration other details of user will be updated in other page in FE after login).
2. Build condition action
The next step is to add a Build condition action
- Add a new
if condition. - Configure the rule: If the result of the previous action contains data, then user exists, we would return the user object which we got from DB.
For this case, add a Data Transformation Action to return the user object retrieved from the database (We have attached screenshots on the configuration that's done which will return the user object from previous action, i.e: from DB).
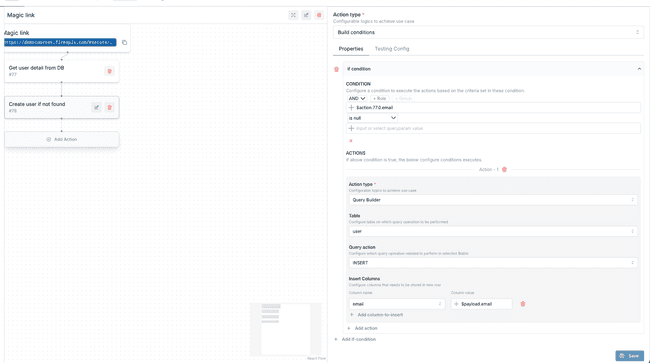
Next, add an otherwise if condition
- Rule: If the result of the previous action is empty, the user does not exist.
- Action: Add a Query Builder action to insert a new user into the user table with the email provided in the payload.
Configure it as follows:
- Table:
user - Query Type:
INSERT - Columns:
email- value wll be taken from input payload(can be done using Dynamic Data Source Selector).
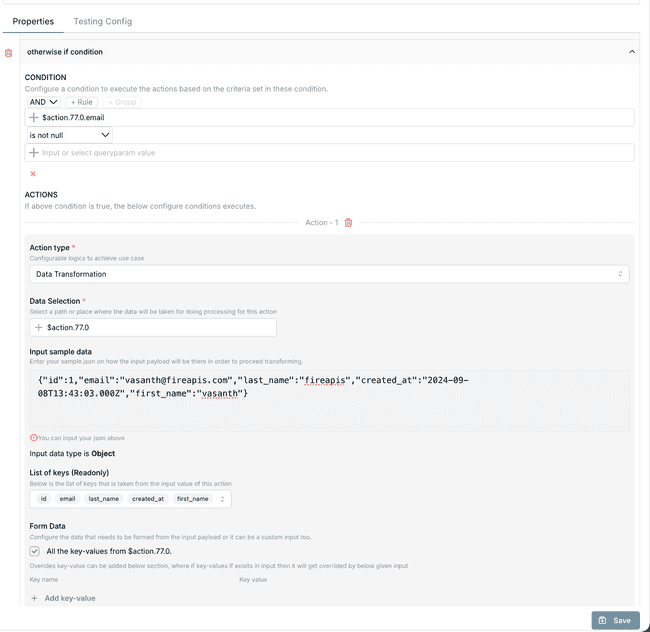
This above action will check if user is null, then create the user
Testing
Now, I will test our logics up to the second action. For this, I will follow the same procedure as described in testing above action.
- Case 1: In input paylod provide a non-existent email to test user creation.
- Case 2: In input paylod provide an existing email to ensure no duplicate user is created.
Test Case -1
If user not exists in database then create user.
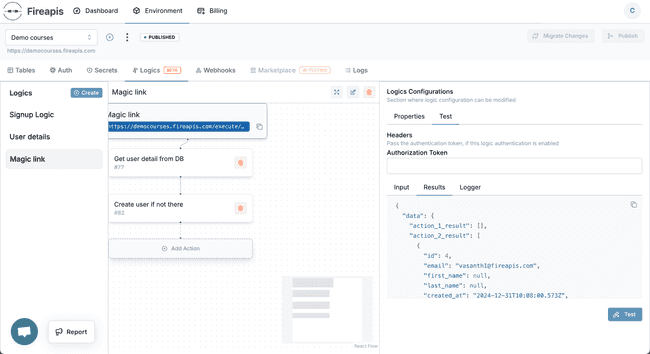
Results
{
  "data": {
    "action_1_result": [],
    "action_2_result": [
      {
        "id": 4,
        "email": "[[email protected]](mailto:[email protected])",
        "first_name": null,
        "last_name": null,
        "created_at": "2024-12-31T10:08:00.573Z",
        "updated_at": "2024-12-31T10:08:00.573Z"
      }
    ]
  }
}
Test Case - 2
If user exists in database, then no duplicate user should be created.
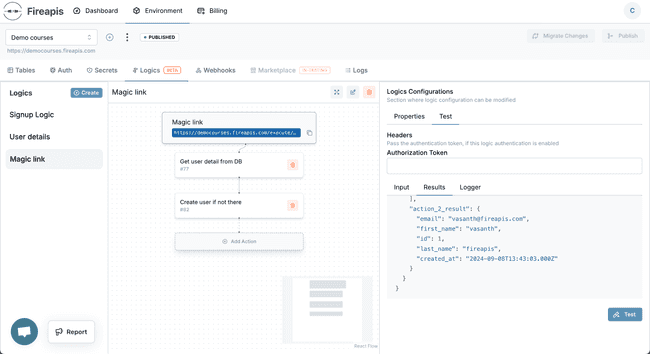
Results
{
  "data": {
    "action_1_result": [
      {
        "email": "[email protected]",
        "first_name": "vasanth",
        "id": 1,
        "last_name": "fireapis",
        "created_at": "2024-09-08T13:43:03.000Z"
      }
    ],
    "action_2_result": {
      "email": "[email protected]",
      "first_name": "vasanth",
      "id": 1,
      "last_name": "fireapis",
      "created_at": "2024-09-08T13:43:03.000Z"
    }
  }
}
Conclusion:
In this first part of the blog, we covered the basics of building magic link logic by setting up the database query and conditional actions. We’ve demonstrated how to verify user existence and handle scenarios for creating new users seamlessly. This helps to build the Nocode development for handling user authentication.
In Part-2, we’ll complete the logic by adding the steps for sending the email, generating tokens, and validating the magic link. Stay tuned for the next part!