Important: Fireapis services will be ending on May 15, 2025. For any concerns, please contact us via in-app chat or throughemail.
How to implement magic link logic on Nocode backend [Part-2]
We have covered step by step guide on implementation of magic link login on nocode backend
Magic Link Login – Part 2
In the first part of magic link blog, we discussed the basics of implementing a magic link login on a no-code backend. This blog is a continuation, where we dive into the next steps.
For sending emails, we’ll use Twilio’s SendGrid email service. We'll utilize their API to send emails, but you can use any email provider, as the process remains the same.
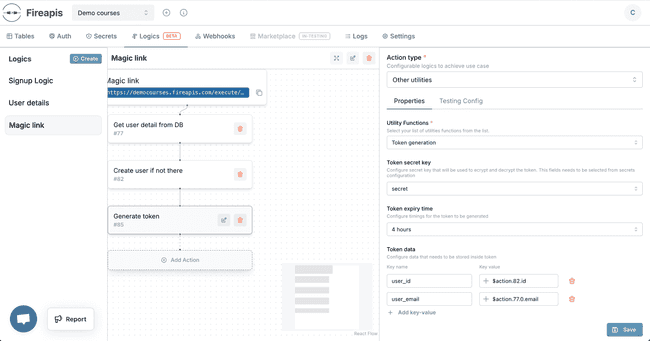
Step 3: Token Generation
The third action is Token Generation. Start by adding a new action and selecting Token Generation as the action type.
You’ll need to configure three sections for this action:
- Token secret key: This key encrypts the token. The same key is required to decrypt and validate the token during authentication. You can choose the secret key from the Secrets Manager, which securely stores API keys and other sensitive credentials.
- Token expiry time: This sets how long the token remains valid. Once it expires, the token can no longer be used.
- Token data
Configure the data included in the token, such as
user_idanduser_email, which will be used for request validation.
Testing the Token Generation Action
Use the Test tab in the logic configuration to verify your setup up to this action.
Expected Test Results
{
"data": {
"action_1_result": [
{
"email": "[email protected]",
"first_name": "vasanth",
"id": 1,
"last_name": "fireapis",
"created_at": "2024-09-08T13:43:03.000Z"
}
],
"action_2_result": {
"email": "[email protected]",
"first_name": "vasanth",
"id": 1,
"last_name": "fireapis",
"created_at": "2024-09-08T13:43:03.000Z"
},
"action_3_result": {
"token": "eyJhbGciOiJIUzI1NiIsInR5cCI6IkpXVCJ9.eyJ1c2VyX2lkIjoxLCJ1c2VyX2VtYWlsIjoidmFzYW50aEBmaXJlYXBpcy5jb20iLCJpYXQiOjE3MzgyMDg3NTMsImV4cCI6MTczODIyMzE1M30.28Bro0HoLfC6qYSvsKOjHIvf-wPPi2raGZZOfQlpRLM"
}
}
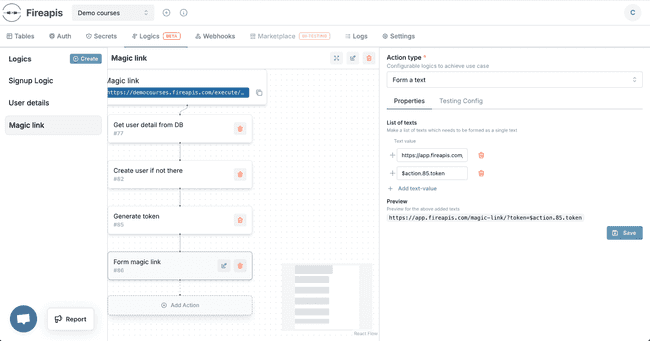
}Step 3: Form a Text
Next, add a Form a Text action to create the magic link url. This contains a list of recipient text with generated token.
We added two text,
first text - A static text eg: https://app.fireapis.com/magic-link/?token=
second text- Previous action result from Token Generation action
Testing the Form a text Action
Use the Test tab in the logic configuration to verify your setup up to this action.
Expected Test Results
{
  "data": {
    "action_1_result": [
      {
        "email": "[email protected]",
        "first_name": "vasanth",
        "id": 1,
        "last_name": "fireapis",
        "created_at": "2024-09-08T13:43:03.000Z"
      }
    ],
    "action_2_result": {
      "email": "[email protected]",
      "first_name": "vasanth",
      "id": 1,
      "last_name": "fireapis",
      "created_at": "2024-09-08T13:43:03.000Z"
    },
    "action_3_result": {
      "token": "eyJhbGciOiJIUzI1NiIsInR5cCI6IkpXVCJ9.eyJ1c2VyX2VtYWlsIjoidmFzYW50aEBmaXJlYXBpcy5jb20iLCJ1c2VyX2lkIjoxLCJpYXQiOjE3MzgyMDg4ODIsImV4cCI6MTczODIyMzI4Mn0.LR16MU8FOnV5IYfHksKNYxy-YB496jpWIjjlhhBKW3w"
    },
    "action_4_result": "https://app.fireapis.com/magic-link/?token=eyJhbGciOiJIUzI1NiIsInR5cCI6IkpXVCJ9.eyJ1c2VyX2VtYWlsIjoidmFzYW50aEBmaXJlYXBpcy5jb20iLCJ1c2VyX2lkIjoxLCJpYXQiOjE3MzgyMDg4ODIsImV4cCI6MTczODIyMzI4Mn0.LR16MU8FOnV5IYfHksKNYxy-YB496jpWIjjlhhBKW3w"
  }
}
Building the Email Payload
To send an email using SendGrid's API, you’ll need to structure the payload in the following format:
{
  "personalizations": [
    {
      "to": [
        {
          "email": "[email protected]",
          "name": "Alex"
        }
      ],
      "dynamic_template_data": {
        "subject": "Hello, Alex",
        "customer_name": "Alex",
        "confirmation_number": "123abc456def789hij0"
      }
    }
  ],
  "from": {
    "email": "[email protected]",
    "name": "Example Order Confirmation"
  },
  "reply_to": {
    "email": "[email protected]",
    "name": "Example Customer Service Team"
  }
}
To create this structure, we’ll use multiple actions. Each action will help build specific parts of the payload:
toarray of object - A list of recipient email addresses and names, built using the Build Array/List Action.dynamic_template_dataobject - Custom data for the email template, such as the login link, built using the Build Object Action.personalizationsarray of object - A combination of to anddynamic_template_data, built using the Build Array/List Action.fromobject - Sender details like[email protected], built using the Build Object Action.reply_toobject Information for handling reply emails, built using the Build Object Action.
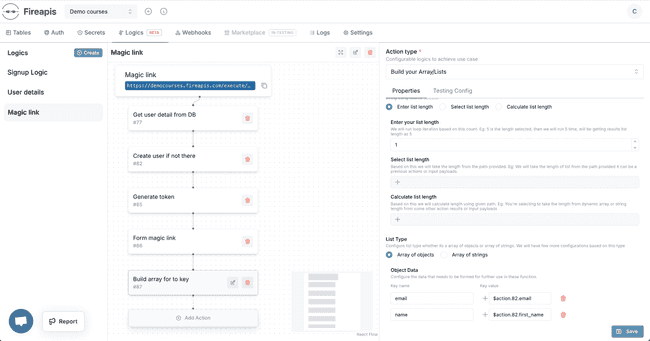
Step 4: Build Array/List Action
Next, add a Build Array/List Action to create the to key. This contains a list of recipient details.
Configuration Steps:
-
List length: Set the list length to 1 for a single recipient.
-
List Type: Choose array of objects and configure key-value pairs. Add keys like
emailandnameand map their values from the user details using the Dynamic Data Selector.
Testing
Use the Test tab to validate that the list contains the expected structure.
Below is the results of this action.
Expected Test Results
{
"data": {
"action_1_result": [
{
"email": "[email protected]",
"first_name": "vasanth",
"id": 1,
"last_name": "fireapis",
"created_at": "2024-09-08T13:43:03.000Z"
}
],
"action_2_result": {
"email": "[email protected]",
"first_name": "vasanth",
"id": 1,
"last_name": "fireapis",
"created_at": "2024-09-08T13:43:03.000Z"
},
"action_3_result": {
"token": "eyJhbGciOiJIUzI1NiIsInR5cCI6IkpXVCJ9.eyJ1c2VyX2lkIjoxLCJ1c2VyX2VtYWlsIjoidmFzYW50aEBmaXJlYXBpcy5jb20iLCJpYXQiOjE3MzgyMzU2NTIsImV4cCI6MTczODI1MDA1Mn0.hwq0fLIQ9K7bWAg9c1MCITEGM0f9LQ2V5fJDystlOdo"
},
"action_4_result": "https://app.fireapis.com/magic-link/?token=eyJhbGciOiJIUzI1NiIsInR5cCI6IkpXVCJ9.eyJ1c2VyX2lkIjoxLCJ1c2VyX2VtYWlsIjoidmFzYW50aEBmaXJlYXBpcy5jb20iLCJpYXQiOjE3MzgyMzU2NTIsImV4cCI6MTczODI1MDA1Mn0.hwq0fLIQ9K7bWAg9c1MCITEGM0f9LQ2V5fJDystlOdo",
"action_5_result": [
{
"email": "[email protected]",
"name": "vasanth"
}
]
}
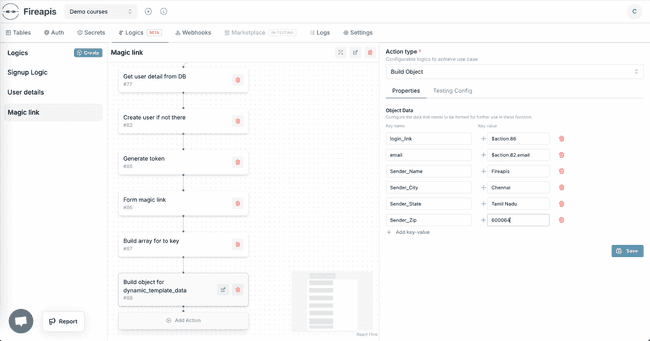
}Step 5: Build Object Action
Add a Build Object Action to create the dynamic_template_data key. This holds custom data for the email template.
Add the following keys:
login_link- Taken from the Form Text Action result.email- Retrieved from the user action result.Sender_Name,Sender_City,Sender_State,Sender_Zip- Static values representing your business details.
Those are the keys which is needed by our template in sendigird, where login_link is the actual link which contains the token as per the magic link design
Testing
Use the Test tab to validate that the list contains the expected structure.
Below is the results of this action.
Expected Test Results
{
"data": {
"action_1_result": [
{
"email": "[email protected]",
"first_name": "vasanth",
"id": 1,
"last_name": "fireapis",
"created_at": "2024-09-08T13:43:03.000Z"
}
],
"action_2_result": {
"email": "[email protected]",
"first_name": "vasanth",
"id": 1,
"last_name": "fireapis",
"created_at": "2024-09-08T13:43:03.000Z"
},
"action_3_result": {
"token": "eyJhbGciOiJIUzI1NiIsInR5cCI6IkpXVCJ9.eyJ1c2VyX2VtYWlsIjoidmFzYW50aEBmaXJlYXBpcy5jb20iLCJ1c2VyX2lkIjoxLCJpYXQiOjE3MzgyMzgwMzcsImV4cCI6MTczODI1MjQzN30.32vLYCIpb3JC8p1DIFvgMNKBdLrkeDPhFf6qdnM59hE"
},
"action_4_result": "https://app.fireapis.com/magic-link/?token=eyJhbGciOiJIUzI1NiIsInR5cCI6IkpXVCJ9.eyJ1c2VyX2VtYWlsIjoidmFzYW50aEBmaXJlYXBpcy5jb20iLCJ1c2VyX2lkIjoxLCJpYXQiOjE3MzgyMzgwMzcsImV4cCI6MTczODI1MjQzN30.32vLYCIpb3JC8p1DIFvgMNKBdLrkeDPhFf6qdnM59hE",
"action_5_result": [
{
"email": "[email protected]",
"name": "vasanth"
}
],
"action_6_result": {
"Sender_State": "Tamil Nadu",
"Sender_City": "Chennai",
"Sender_Name": "Fireapis",
"email": "[email protected]",
"login_link": "https://app.fireapis.com/magic-link/?token=eyJhbGciOiJIUzI1NiIsInR5cCI6IkpXVCJ9.eyJ1c2VyX2VtYWlsIjoidmFzYW50aEBmaXJlYXBpcy5jb20iLCJ1c2VyX2lkIjoxLCJpYXQiOjE3MzgyMzgwMzcsImV4cCI6MTczODI1MjQzN30.32vLYCIpb3JC8p1DIFvgMNKBdLrkeDPhFf6qdnM59hE",
"Sender_Zip": "600064"
}
}
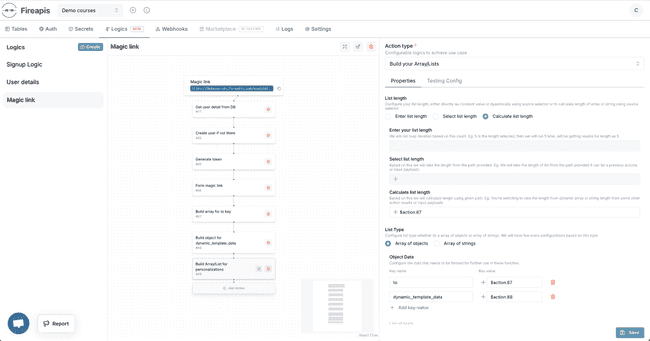
}Step 6: Build Array/List Action for personalizations
Create the personalizations key using another Build Array/List Action.
Configuration Steps:
- List length:
Calculate the length dynamically based on the results of the to action.
- List Type:
Choose array of objects and configure keys like to and dynamic_template_data, mapping them from previous action results.
Below is the screenshots.
Testing
Use the Test tab to validate that the list contains the expected structure.
Below is the results of this action.
Expected Test Results
{
"data": {
"action_1_result": [
{
"email": "[email protected]",
"first_name": "vasanth",
"id": 1,
"last_name": "fireapis",
"created_at": "2024-09-08T13:43:03.000Z"
}
],
"action_2_result": {
"email": "[email protected]",
"first_name": "vasanth",
"id": 1,
"last_name": "fireapis",
"created_at": "2024-09-08T13:43:03.000Z"
},
"action_3_result": {
"token": "eyJhbGciOiJIUzI1NiIsInR5cCI6IkpXVCJ9.eyJ1c2VyX2lkIjoxLCJ1c2VyX2VtYWlsIjoidmFzYW50aEBmaXJlYXBpcy5jb20iLCJpYXQiOjE3MzgyMzgzNzIsImV4cCI6MTczODI1Mjc3Mn0.7tMHw19u6pcYwYyqOALfE0Uu2nNeuz1Tdw_fW3Z0mhE"
},
"action_4_result": "https://app.fireapis.com/magic-link/?token=eyJhbGciOiJIUzI1NiIsInR5cCI6IkpXVCJ9.eyJ1c2VyX2lkIjoxLCJ1c2VyX2VtYWlsIjoidmFzYW50aEBmaXJlYXBpcy5jb20iLCJpYXQiOjE3MzgyMzgzNzIsImV4cCI6MTczODI1Mjc3Mn0.7tMHw19u6pcYwYyqOALfE0Uu2nNeuz1Tdw_fW3Z0mhE",
"action_5_result": [
{
"email": "[email protected]",
"name": "vasanth"
}
],
"action_6_result": {
"email": "[email protected]",
"login_link": "https://app.fireapis.com/magic-link/?token=eyJhbGciOiJIUzI1NiIsInR5cCI6IkpXVCJ9.eyJ1c2VyX2lkIjoxLCJ1c2VyX2VtYWlsIjoidmFzYW50aEBmaXJlYXBpcy5jb20iLCJpYXQiOjE3MzgyMzgzNzIsImV4cCI6MTczODI1Mjc3Mn0.7tMHw19u6pcYwYyqOALfE0Uu2nNeuz1Tdw_fW3Z0mhE",
"Sender_Zip": "600064",
"Sender_State": "Tamil Nadu",
"Sender_City": "Chennai",
"Sender_Name": "Fireapis"
},
"action_7_result": [
{
"dynamic_template_data": {
"email": "[email protected]",
"login_link": "https://app.fireapis.com/magic-link/?token=eyJhbGciOiJIUzI1NiIsInR5cCI6IkpXVCJ9.eyJ1c2VyX2lkIjoxLCJ1c2VyX2VtYWlsIjoidmFzYW50aEBmaXJlYXBpcy5jb20iLCJpYXQiOjE3MzgyMzgzNzIsImV4cCI6MTczODI1Mjc3Mn0.7tMHw19u6pcYwYyqOALfE0Uu2nNeuz1Tdw_fW3Z0mhE",
"Sender_Zip": "600064",
"Sender_State": "Tamil Nadu",
"Sender_City": "Chennai",
"Sender_Name": "Fireapis"
},
"to": [
{
"email": "[email protected]",
"name": "vasanth"
}
]
}
]
}
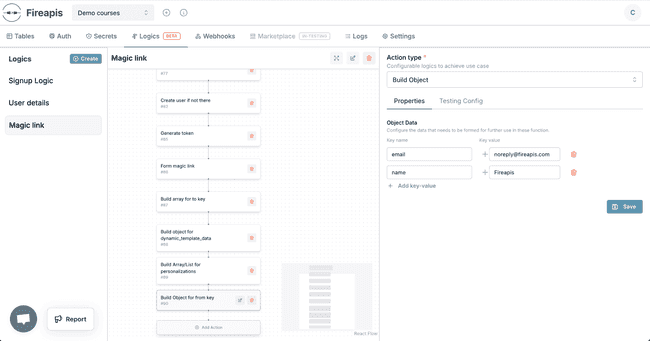
}Step 7: Build Object Action for from
Add a Build Object Action to configure the from key. This specifies the sender's email and name.
Add the following keys:
email- A static value, e.g.,[email protected].name- A static value, e.g.,Fireapis.
Testing
Use the Test tab to validate that the list contains the expected structure.
Below is the results of this action.
Expected Test Results
{
"data": {
"action_1_result": [
{
"email": "[email protected]",
"first_name": "vasanth",
"id": 1,
"last_name": "fireapis",
"created_at": "2024-09-08T13:43:03.000Z"
}
],
"action_2_result": {
"email": "[email protected]",
"first_name": "vasanth",
"id": 1,
"last_name": "fireapis",
"created_at": "2024-09-08T13:43:03.000Z"
},
"action_3_result": {
"token": "eyJhbGciOiJIUzI1NiIsInR5cCI6IkpXVCJ9.eyJ1c2VyX2lkIjoxLCJ1c2VyX2VtYWlsIjoidmFzYW50aEBmaXJlYXBpcy5jb20iLCJpYXQiOjE3MzgyMzg2MjQsImV4cCI6MTczODI1MzAyNH0.BwW-anbymKQhmbkR6UCOGbO-gZaUcugVGmzY99Lu8Wg"
},
"action_4_result": "eyJhbGciOiJIUzI1NiIsInR5cCI6IkpXVCJ9.eyJ1c2VyX2lkIjoxLCJ1c2VyX2VtYWlsIjoidmFzYW50aEBmaXJlYXBpcy5jb20iLCJpYXQiOjE3MzgyMzg2MjQsImV4cCI6MTczODI1MzAyNH0.BwW-anbymKQhmbkR6UCOGbO-gZaUcugVGmzY99Lu8Wghttps://app.fireapis.com/magic-link/?token=",
"action_5_result": [
{
"email": "[email protected]",
"name": "vasanth"
}
],
"action_6_result": {
"login_link": "eyJhbGciOiJIUzI1NiIsInR5cCI6IkpXVCJ9.eyJ1c2VyX2lkIjoxLCJ1c2VyX2VtYWlsIjoidmFzYW50aEBmaXJlYXBpcy5jb20iLCJpYXQiOjE3MzgyMzg2MjQsImV4cCI6MTczODI1MzAyNH0.BwW-anbymKQhmbkR6UCOGbO-gZaUcugVGmzY99Lu8Wghttps://app.fireapis.com/magic-link/?token=",
"email": "[email protected]",
"Sender_Name": "Fireapis",
"Sender_City": "Chennai",
"Sender_State": "Tamil Nadu",
"Sender_Zip": "600064"
},
"action_7_result": [
{
"to": [
{
"email": "[email protected]",
"name": "vasanth"
}
],
"dynamic_template_data": {
"login_link": "eyJhbGciOiJIUzI1NiIsInR5cCI6IkpXVCJ9.eyJ1c2VyX2lkIjoxLCJ1c2VyX2VtYWlsIjoidmFzYW50aEBmaXJlYXBpcy5jb20iLCJpYXQiOjE3MzgyMzg2MjQsImV4cCI6MTczODI1MzAyNH0.BwW-anbymKQhmbkR6UCOGbO-gZaUcugVGmzY99Lu8Wghttps://app.fireapis.com/magic-link/?token=",
"email": "[email protected]",
"Sender_Name": "Fireapis",
"Sender_City": "Chennai",
"Sender_State": "Tamil Nadu",
"Sender_Zip": "600064"
}
}
],
"action_8_result": {
"email": "[email protected]",
"name": "Fireapis"
},
"action_9_result": {
"email": "[email protected]",
"name": "Fireapis"
}
}
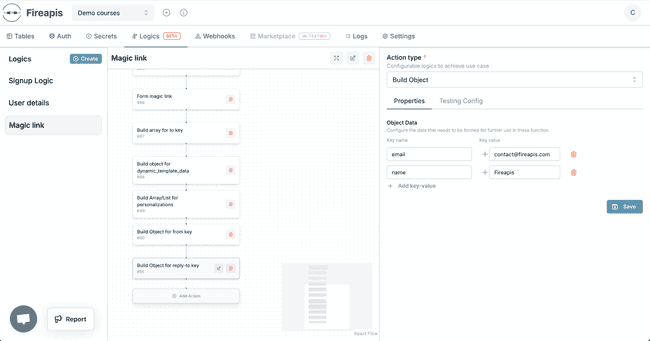
}Step 8: Build Object Action for reply_to
Add another Build Object Action for the reply_to key, which specifies the email address to receive replies.
Add the following keys:
email- A static value, e.g.,[email protected].name- A static value, e.g.,Fireapis.
Testing
Use the Test tab to validate that the list contains the expected structure.
Below is the results of this action.
Results
{
"data": {
"action_1_result": [
{
"email": "[email protected]",
"first_name": "vasanth",
"id": 1,
"last_name": "fireapis",
"created_at": "2024-09-08T13:43:03.000Z"
}
],
"action_2_result": {
"email": "[email protected]",
"first_name": "vasanth",
"id": 1,
"last_name": "fireapis",
"created_at": "2024-09-08T13:43:03.000Z"
},
"action_3_result": {
"token": "eyJhbGciOiJIUzI1NiIsInR5cCI6IkpXVCJ9.eyJ1c2VyX2lkIjoxLCJ1c2VyX2VtYWlsIjoidmFzYW50aEBmaXJlYXBpcy5jb20iLCJpYXQiOjE3MzgyMzg2MjQsImV4cCI6MTczODI1MzAyNH0.BwW-anbymKQhmbkR6UCOGbO-gZaUcugVGmzY99Lu8Wg"
},
"action_4_result": "eyJhbGciOiJIUzI1NiIsInR5cCI6IkpXVCJ9.eyJ1c2VyX2lkIjoxLCJ1c2VyX2VtYWlsIjoidmFzYW50aEBmaXJlYXBpcy5jb20iLCJpYXQiOjE3MzgyMzg2MjQsImV4cCI6MTczODI1MzAyNH0.BwW-anbymKQhmbkR6UCOGbO-gZaUcugVGmzY99Lu8Wghttps://app.fireapis.com/magic-link/?token=",
"action_5_result": [
{
"email": "[email protected]",
"name": "vasanth"
}
],
"action_6_result": {
"login_link": "eyJhbGciOiJIUzI1NiIsInR5cCI6IkpXVCJ9.eyJ1c2VyX2lkIjoxLCJ1c2VyX2VtYWlsIjoidmFzYW50aEBmaXJlYXBpcy5jb20iLCJpYXQiOjE3MzgyMzg2MjQsImV4cCI6MTczODI1MzAyNH0.BwW-anbymKQhmbkR6UCOGbO-gZaUcugVGmzY99Lu8Wghttps://app.fireapis.com/magic-link/?token=",
"email": "[email protected]",
"Sender_Name": "Fireapis",
"Sender_City": "Chennai",
"Sender_State": "Tamil Nadu",
"Sender_Zip": "600064"
},
"action_7_result": [
{
"to": [
{
"email": "[email protected]",
"name": "vasanth"
}
],
"dynamic_template_data": {
"login_link": "eyJhbGciOiJIUzI1NiIsInR5cCI6IkpXVCJ9.eyJ1c2VyX2lkIjoxLCJ1c2VyX2VtYWlsIjoidmFzYW50aEBmaXJlYXBpcy5jb20iLCJpYXQiOjE3MzgyMzg2MjQsImV4cCI6MTczODI1MzAyNH0.BwW-anbymKQhmbkR6UCOGbO-gZaUcugVGmzY99Lu8Wghttps://app.fireapis.com/magic-link/?token=",
"email": "[email protected]",
"Sender_Name": "Fireapis",
"Sender_City": "Chennai",
"Sender_State": "Tamil Nadu",
"Sender_Zip": "600064"
}
}
],
"action_8_result": {
"email": "[email protected]",
"name": "Fireapis"
},
"action_9_result": {
"email": "[email protected]",
"name": "Fireapis"
}
}
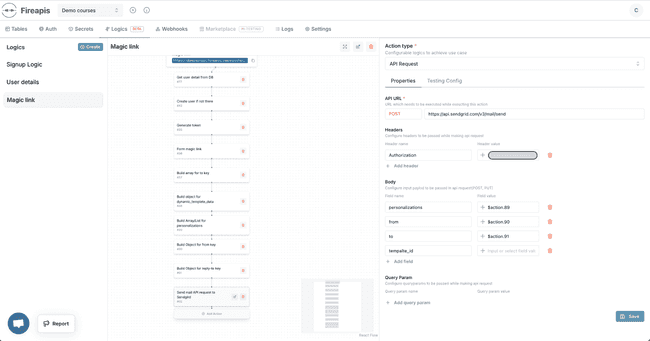
}Step 9: API Request Action
Finally, configure an API Request Action to send the email using the SendGrid API.
Configuration Steps:
- API Method Select
POSTmethod - API URL: Enter sendgird api url
https://api.sendgrid.com/v3/mail/send - Headers: Add an
Authorizationheader with your SendGrid API key. - Body: - Include keys like
to,dynamic_template_data,personalizations,from,reply_to, mapped from previous actions andtempalte_idwhich we can get it from sendgird user interface.
Below is screenshots
Testing
Use the Test tab to validate that the list contains the expected structure.
In this testing we are making call to sendgird where you will start receiving magic link in your email.
Results
{
  "data": {
    "action_1_result": [],
    "action_2_result": [
      {
        "id": 4,
        "email": "[[email protected]](mailto:[email protected])",
        "first_name": null,
        "last_name": null,
        "created_at": "2024-12-31T10:08:00.573Z",
        "updated_at": "2024-12-31T10:08:00.573Z"
      }
    ]
  }
}

Conclusion:
In this blog, we showed how to easily set up a magic link login flow using no-code. We covered generating tokens, creating email content, and sending it through SendGrid.